

User experience design is ultimately about answering the same old question: What does the person on the other side of the screen actually wants and needs? To be honest, this question concerns everyone else, too. Marketers, salespeople, product developers in all industries are trying to figure out how to capture and hold a customer’s attention. And it seems like the most recent approach is to do it with empathy.
Empathic design involves tailoring the product to the user, rather than having them pave their own way through internet jungles. It studies human behavior the same way a psychologist does to find underlining logic in how people think and solve their problems. One of the psychological concepts -- the flow state -- has been borrowed too, to help build seamless digital experiences for users to enjoy and linger. Let’s talk about creating and documenting great user flows.
What is user flow and where does it fit in UX design?
User flow is a key to the whole user experience of the product. The goal of UX is to nurture users’ loyalty and satisfaction with your business by helping them solve a problem or complete a task in the most comfortable and enjoyable way. And that can only be done through a series of planned-out interactions a user will have with the product. Interactions that would lead them through the product pages smoothly, like entering a flow state.

User flow examples for Niftie. Source: Niftie case study
This sequence of interactions is commonly described in a form of a branching flowchart. This flowchart serves as a handy tool for the rest of the development team to build the product upon. Namely, it dictates the building blocks of the website’s information architecture.
The information architecture is a sitemap, navigation, or menu that classifies all product content so that customers can easily find what they’re looking for. To understand what users will need and how they would like to achieve it, UX researchers conduct a lot of interviews, surveys, and tests.
A lot goes into user flow creation. This process can be divided into four big steps:
- Planning (sketching your goals and entry points)
- Designing (creating the first flow and upgrading it)
- Documenting (crafting the user flow diagram and sharing it)
- Testing (collecting metrics and performing analysis)
Now let’s start from the beginning.
1. Identify your objectives
To know where to start, you must know where you’re going. A user flow is easier to create when you know what the final action of the flow will be. Earlier we discussed that the goal of UX design is helping users solve their problems and acquiring their predisposition on the way. While this is true, to design a user flow, you need to determine more low-level goals.
Determine business goals
Business objectives or where you want the customers to end up. Some common final actions from the business perspective include:
- Making a purchase
- Signing up for a newsletter
- Following your business on social media
- Creating an account, etc.
Ideally, every flow should end with a call to action addressing one of your goals, so even if the person branches out from the “shop” flow, they get redirected to “subscribe for a 10 percent discount” action. So when there’s value for the business when users reach these actions, users should have their needs satisfied as well. Let’s talk about learning those needs.
Determine user goals
User objectives are what your users want from your product. Ultimately, they might be wanting the same (to make a purchase) but they often require additional information or have some barriers. You must solve their problems while they’re in the flow. To identify their needs and problems, answer these questions.
What are they trying to achieve with your product? Try determining why a person clicked on your website link in the first place. For example, they might need to find a good website to order food for their new puppy.
Why do they need to achieve that? You need the underlying motivation, such as finding a healthy diet for their dog at a reasonable price.
How can your product help them achieve this goal? Identify the features they may find useful. Say, they need to compare brands to learn what’s available on the market, filter them by ingredients, or set up a monthly delivery.
What additional information will they need to achieve the goal? Consider what your customers will look into before deciding on a purchase. They may want to check shipping fees, any discounts you’re currently running, or reviews.
What barriers might users be having to achieve the goal? What can make them abandon the website altogether? Unclear conditions, lack of their preferred payment method, slow website, etc.
UX researchers are able to answer these questions while they’re conducting user interviews or using guerilla research techniques. They usually group the types of answers they get into user persona profiles -- archetypical models of your potential customers. For example:
- Caroline, 25, freelance writer, who just adopted her first dog and is looking into ways to keep it healthy without breaking the bank.
- Martha, 53, small business owner, who used to buy food for her two dogs offline, but has been trying a few online options for convenience.
- Andre, 34, software developer and loyal customer, who enjoys reading your puppy care blog.
Create profiles with answers to the aforementioned question, so when you’re designing the flow, you can easily emphasize with a person and predict what their next action might be.
2. Determine entry points
People don’t just appear on your website; they come from somewhere. And their traffic source majorly reflects their motivations and actions they will take further to accomplish it. So, you will need user flow diagrams for every entry point. Let’s review different traffic sources and highlight what motivations and goals people usually come with.
Organic traffic
People searching for a particular keyword can land on many different pages of your website, depending on the ones you decide to optimize for SEO the most. Either way, people who use organic search haven’t made up their decision yet and require a lot of extra information.
This is the path our persona Caroline is most likely to take. Here’s what it might look like:
- Googling “best puppy food 2021”
- Entering your blog post
- Clicking the link to the best option in her budget
- Clicking on the reviews tab
- Clicking on the shipping information tab
- Browsing through bundle suggestions
- Making a purchase
As you can see, Caroline not only needed information on the product she was looking for but also on you as a provider. Smart placement of relevant links helps her find all the needed answers in a few clicks and eliminate any concerns she might have had before.
Paid advertising
Modern advertisement algorithms allow us to target the most relevant users, so when they click the link in the ad, they appear on a landing page. The further flow depends on what you’re planning to achieve with this advertising campaign. Suppose, you’re announcing your big Black Friday sale and want people to join the email subscription for an extra discount.
You’re targeting people like Martha who previously visited your website in her research. The user flow might look something like this:
- Clicking the link in the Facebook ad
- Entering the Black Friday landing page
- Leaving her email
Notice how both business and user goals matched in this example: you get more traffic on the website, and visitors can take advantage of their discount.
Direct traffic
If someone knows your website by heart and manually enters it into the browser or clicks on the app icon on their phone, it’s both convenient, as you will likely get that sale, but also complicated, as the user might have tons of different intentions. This means that all user flows must be properly mapped out from the home page.
Say, your loyal customer Andre entered to see if there’s anything new on the website. He might take one of several steps from there:
- Clicking on the banner promoting seasonal items
- Typing something in the search bar
- Clicking on the menu to check categories for ideas, etc.
Whether the user succeeds after starting on the home page is a great test for your information architecture, as all possible user flows must be organically connected to the main hub, and the user shouldn’t feel overwhelmed or lost with all the options.
Newsletter
Similar to the paid advertisement, people clicking on the link in the newsletter will end up on the landing page, likely, to the specific product or product category that you’re promoting with this email.
The main task here is to maintain the flow they’ve already started and eliminate any distractions and barriers on the way.
Social links
Shared on social media or in direct messages, users who click on these links are more inclined to make a purchase as the website was recommended by a friend. Here, you’re not the one who needs to address the user’s needs as they’ve likely been addressed by someone who shared the link with them. Similarly to the newsletter entry point, all barriers must be gone and your goal is to convert a new customer into a repeating one.
Now as you’ve decided on the entry point and the final action, let’s talk about the meat of the user flow and explore how to effectively design the steps.
3. Sketch your user flow chart outline
User flow creation is an iterative process that begins when you’re just figuring out the functionality of your product and are not bothered with how aesthetic or finalized your flow will look just now. A handy tool for this outlining would be creating task flows.
A task flow describes a person’s experience with a single specific task. It’s usually linear and has few branches, assuming that all users will have the same entry points and goals, so it’s generally difficult to create a confusing or complicated experience here. Task flows are also usually UI-independent as they’re the same on every device.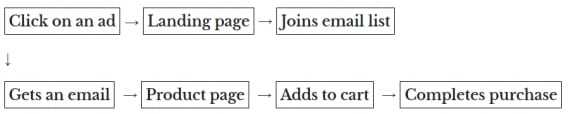
Task flows don’t require any special software and can be written on paper, a whiteboard, or in a text document using simple text boxes and arrows. Source: CXL
Task flows describe such processes as:
- Signing up or logging in
- Adding an item to the cart
- Entering payment/shipping information
- Using search console
- Reading the blog
- Viewing saved options, etc.
Task flows have two useful applications:
- They allow us to notice dead ends in the flow and pinpoint what actions we’re ignoring or forgetting.
- They help us document functionality for engineers, stakeholders, and other team members at the early stages of designing.
A task flow will be your reference for creating more complex and interactive flows. They’re usually transformed into another type of diagram -- wireflows.
4. Upgrade your wireframes into wireflows
Wireflows are combinations of task flows and product wireframes -- schematic illustrations of software’s future interface. While task flows are part of the planning process, wireframes are created in the design stage, so their hybrid allows you to understand the product’s functionality and appearance at the same time.
The big advancement from the previous step is that wireflows document the layout as well as interactions. Wireframes are positioned in sequence and using icons, color highlights, and arrows, they’re connected to show where user actions lead them next.

Using wireflows for user flow illustration. Source: Balsamiq
Wireflows are useful for:
- Mobile and web app user flows where pages have tons of dynamic content rather than static pages where each click navigates you to a different page.
- Information architecture prototyping helping you make sure that you’ve included all the content needed at each stage.
- UX writing giving your content writers enough context to start crafting microcopy.
- Ideation allowing your team to collaborate in workshops and easily visualize design options.
Ultimately, wireflows perform an important function of documenting the feedback users are getting after each interaction, which adds much more context and understanding of the final experience at the design stage. Yet, wireflows are not perfect for creating an overview of the user flow itself and can soon become overbearing when you’re trying to make structural rather than visual decisions. Let’s learn when and how to employ user flow charts as opposed to task flows and wireflows.
5. Document a user flow diagram
A user flow diagram illustrates the whole journey of the user from entering the website to achieving their goal. It’s one of the main documents in the product documentation stack provided to engineers and stakeholders to show the underlining structure of the future system. Since the diagram will be viewed and used by multiple parties for many reasons, you need to consider its organization and presentation.
Define flow elements
A diagram should be easily readable, regardless of who’s looking at each and how much they scale it. So, user flow charts developed their own language of shapes that helps people intuitively interpret the connection between different actions on the screen. They include the following.

Typical flowchart shapes. Source: Overflow
Rectangles. The most common element of user flows, a rectangle indicates the pages or fields within the same page, such as “User profile” and “Seat selection.”
Circles. Usually assigned for actions, circles indicate the process that must be taken to go to the next step of the flow. They also visualize the flow entry and finish. Circles are most often labeled with verbs, like “Book” or “Send order,” and they are also often omitted when the flow describes something happening on the same page.
Diamonds. Use diamonds when you’re asking a question or there’s a decision to be made. In the shopping flow, the diamond would be positioned before dividing the path into two branches: for registered users and for non-registered users. Diamonds are typically labeled with shortened questions and are followed by arrows “Yes” and “No”.
Your user flow doesn’t have to look a certain way and all alterations that you see fit are welcome. Remember to provide the legend and use colors sparingly and meaningfully.
Employ user flow templates
You can create flowcharts in tons of regular tools like Microsoft Visio or Draw.io. They usually have templates, elements, and icons that will help you easily sketch, edit, and share ideas. But let’s talk about specialized product management software that helps create user flows and its advanced features that will prove useful.
Timblee. Operating with easy drag-and-drop features, Timblee is a minimal information architecture design tool that helps to sketch a sitemap and user flows. It provides basic shapes and icons with limited variation. Timblee also supports collaboration and integrations with project management tools like Basecamp, Asana, Trello, and Zapier. You can share a link or download a pretty diagram in any format to print and use in your office.
Logging in template. Source: Timblee
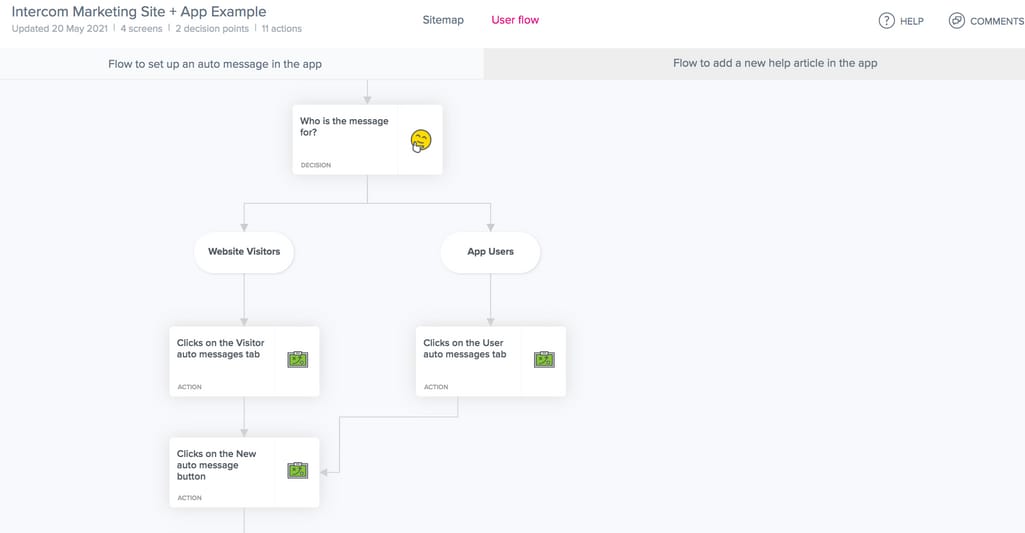
Overflow. This tool promises to become everyone’s favorite user flow building platform. One of its handy features is the ability to import your designs from Sketch and Figma to create wireflows in a couple of clicks. Overflow is stylish and uses the common flowchart elements like rectangles and diamonds, and allows not only to share the link to the diagram but use the presentation mode, which creates engaging and interactive experiences for the audience.
FlowMapp. Allowing to create a sitemap, user flows, and even personas, FlowMapp is one of the leading platforms with a beautiful design that provides you all types of shapes, connectors, and icons you may need for creation. They also have templates of user flows, including onboarding, changing a profile picture, using search, signing up, etc.
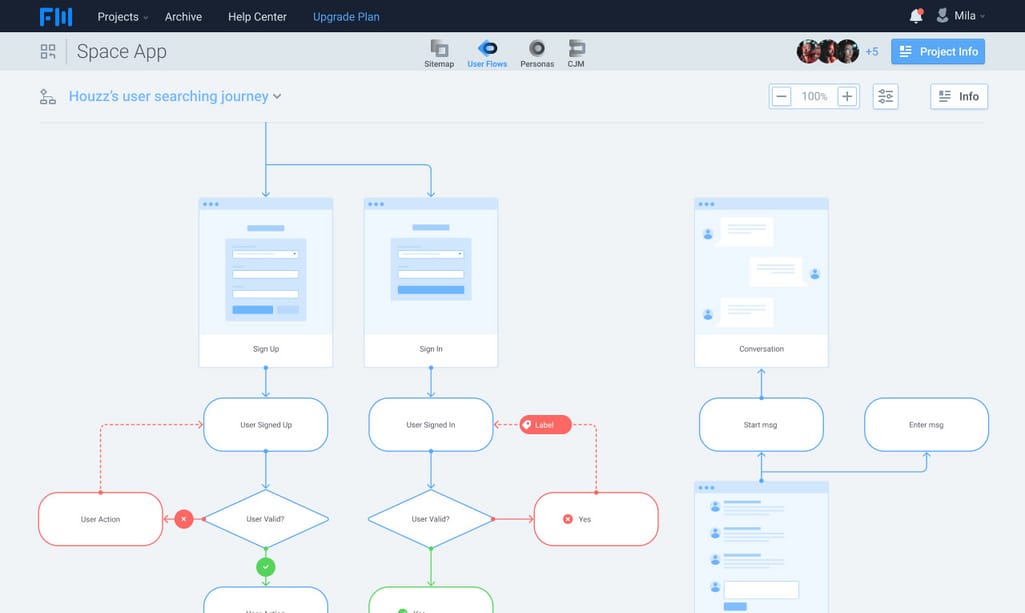
Mixing wireframes into the flow chart. Source: FlowMapp
Cacoo. This general-purpose diagram creation tool doesn’t have an impressive visual style but offers a huge library of templates and a document management dashboard, which can easily become your go-to place to save all your diagrams. Collaboration features are also interesting -- you can chat and have video calls directly in Cacoo. Embed created diagrams wherever you want and integrate them with Google Drive or Confluence for easy documentation configuration.
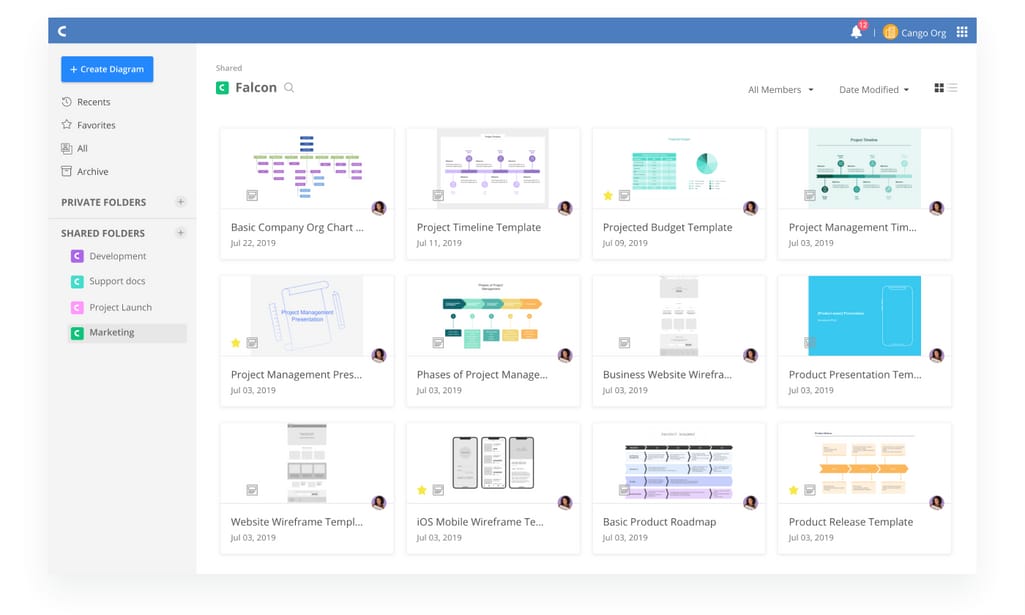
Simple and intuitive document management feature. Source: Cacoo
Wireflow. The only totally free tool in this selection, Wireflow was created to simplify the process as much as possible so that even non-designers can intuitively master user flow creating. With a huge library of wireframe icons, you can visualize the flow at the earliest design stages and collaborate at the same level the more advanced tools provide.
These tools allow you to easily edit your flow, which will likely happen multiple times, especially after you start testing.
6. Test and analyze user flow
How do you know that your user flow works well? You test it. Unfortunately, there’s no specific tool to check how well your flow feels for the person so you can use the combination of user interviews and metrics collections to find what works well and what doesn’t. There are different methods that provide different results. Let’s review them.
Conduct user interviews
In an interview setting, participants (your potential or current users) are asked to perform specific tasks while the facilitator is moderating and monitoring the performance, trying to collect as many insights as possible. These include:
- Immediate feedback on completing or failing to complete tasks
- Thoughts a user has while performing actions
- A user’s facial expressions in the process and at completing
- A user’s answers to follow-up questions, etc.
Participants and interviewers can be meeting in real life, or via video chat, when a user shares their screen. In both instances, it’s common to capture the screen and the participant’s face via webcam, as both videos will be reviewed and analyzed by the rest of the team when offering improvements.
Perform unmoderated testing
Although this form of testing provides no communication with the user, it might be easier to employ interviewees online via remote-testing tools. There, a user is also asked to perform a series of tasks with all their actions screen-captured. Sometimes, video from their webcam is provided as well.
One of the other advantages of this method is that the tool often provides transcripts, calculates the metrics automatically, and records interesting insights. Let’s talk about the metrics and insights that will be useful in the next section.
Collect usability metrics
User interviews provide a lot of findings, which you will have to transform into actionable insights. They include the following.
- The percent of participants reaching the target action
- Average time spent on the task
- The average number of clicks
- The average number of visited pages
- The shortest and the fastest paths taken
- The number of unique problems
- The percent of participants that encountered a certain problem
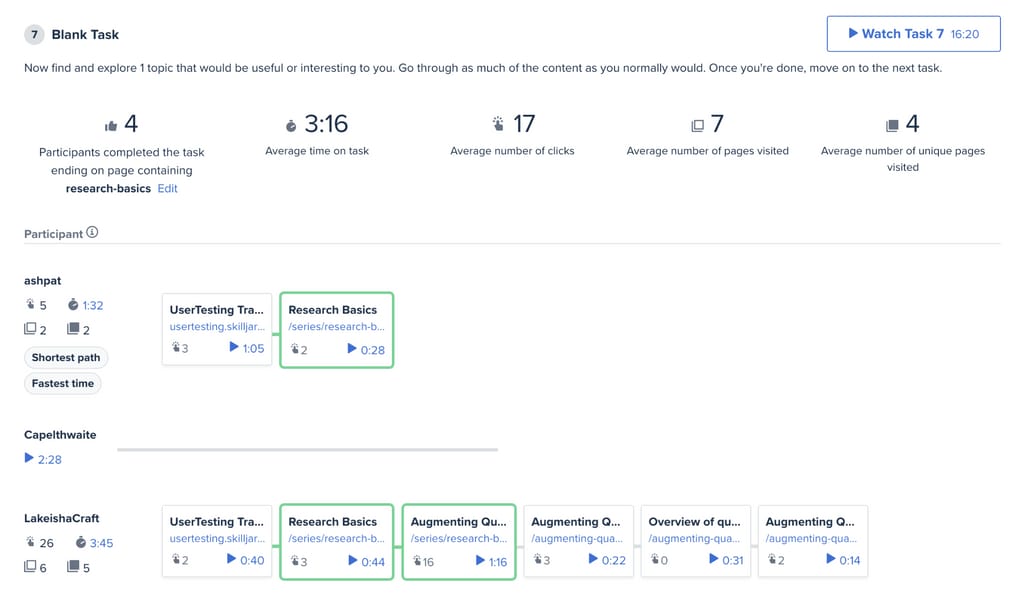
A dashboard with user flow metrics. Source: UserTesting
You would also want to keep the stats about the questions you’re asking, such as how confident they were feeling when operating the task or how satisfied they were with the result.
While these tests are targeted at user flows that are currently in development and haven’t gone live yet, there’s an extra method for checking how well your current user flow is doing and what you should consider in the redesign.
Perform user flow analysis
The simplest way to analyze your existing user flows is via Google Analytics, although there are other tools like Mixpanel that provide more advanced features. Either way, they work similarly.

Some tools allow you to pick your starting and final action and see how many people go through the specific flow. Source: Mixpanel
User flow analysis allows you to see how groups from particular segments interact with your system. Specifically, this includes such information as:
- the number of users that passed through the flow,
- the number of completions in that flow,
- the number of users who left the flow and moved to another page.
This alone will let you know:
- what paths are the most popular on your website and whether you’re placing your calls to action on them;
- what series of actions lead users to leave the flow;
- what user segments perform what actions.
It makes sense to conduct regular user flow analysis after every design change or simply after a certain time as your positioning, users, and the market naturally change.
Strengthening the natural flow
A user flow doesn’t go against a person’s natural instincts -- it adjusts to them, crafting the experience that feels helpful and involving. For this, the UX flow must incorporate the main factors contributing to the natural mental flow.
The sense of structure and direction. People enter the flow state when they see a clear goal and are involved in accomplishing it. Let your users know where they’re going and how it will help them reach their destination.
Understanding that they will succeed. When people have enough information and tools to solve their problems, the goal becomes attainable. Provide options for customers to discover what they’re looking for, and don’t let them hit a dead end.
Immediate feedback. People appreciate the response as it indicates that they’re doing something right. Always provide feedback on what’s currently happening and how they’re doing. Animations, colors, and textual notifications play an important role in creating a satisfying experience and eliminating confusion.

Maryna is a passionate writer with a talent for simplifying complex topics for readers of all backgrounds. With 7 years of experience writing about travel technology, she is well-versed in the field. Outside of her professional writing, she enjoys reading, video games, and fashion.
Want to write an article for our blog? Read our requirements and guidelines to become a contributor.